Shrubs
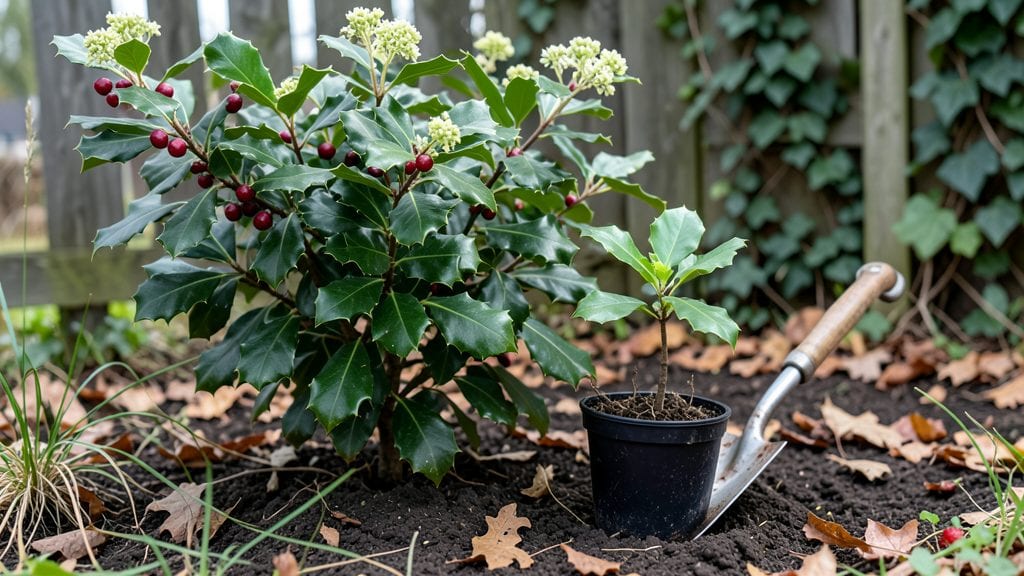
Planting holly bushes transforms your yard into a lush, year-round green backdrop that needs almost no upkeep. 🌿 I’ve planted holly in full sun and partial shade, and the glossy leaves stay vibrant even in winter—no other shrub does that.
The key is getting the soil and spacing right from the start, or you’ll end up with leggy plants that struggle to fill out.
You’ll need well-draining soil mixed with compost, a shovel, and a wheelbarrow for hauling. Space them 6 to 10 feet apart depending on the variety—dwarf hollies can go closer, while standard types need room to grow.
Plant in early spring or fall when the ground is workable but not frozen, and avoid extreme heat or cold. Most nurseries sell bare-root or container-grown hollies, so pick what fits your budget and timeline.
After planting, water deeply to settle the soil, then keep it consistently moist for the first two weeks—no soggy roots, just steady hydration. Mulch around the base to lock in moisture and block weeds, but leave a few inches of space around the trunk.
The first year is all about establishing roots, so resist the urge to prune until you see new growth in spring. By summer, you’ll have a dense, evergreen hedge that outshines anything from a big-box store.
Holly thrives in zones 5 through 9, so check your local climate—some varieties handle frost better than others. If you’re in a hot, dry area, water a little more frequently, but most hollies are drought-tolerant once established.
The real secret? Planting them correctly the first time means you’ll spend zero time pruning or fussing over them later. Let’s get those bushes in the ground.
📚 In This Guide
- What you need
- Instructions
- Tips and common mistakes
- Wrapping up and next steps
What you need
- ● Holly bushes: 2–5 plants (depending on desired coverage; spacing 6–10 ft apart for mature size). Choose Ilex varieties like Ilex opaca (American holly) or Ilex × ‘Nellie R. Stevens’ (female plants for berries).
- ● Shovel or trowel: A garden shovel (for digging holes) or a hand trowel (for smaller plants).
- ● Garden gloves: Heavy-duty, water-resistant gloves to protect your hands.
- ● Compost or well-aged manure: 2–3 gallons per plant to enrich the soil.
- ● Mulch: 2–3 inches of pine straw, bark, or shredded leaves to retain moisture and suppress weeds.
- ● Watering can or hose with nozzle: For gentle, deep watering (avoid overhead sprinklers to prevent fungal diseases).
- ○ Stakes & twine (optional but recommended): If planting in windy areas, use 3–4 ft bamboo stakes and soft twine to support young plants.
- ● Soil test kit: Check pH (holly thrives in acidic soil, pH 5.0–6.0). Adjust with sulfur or peat moss if needed.
- ● Slow-release fertilizer: A balanced 10-10-10 or acid-loving plant fertilizer to give your holly a nutrient boost.
- ● Plant tags: Label varieties (especially if mixing male/female plants for berries!).
- ● Pruning shears: Sharp, bypass-pruners for shaping (though holly needs minimal pruning!).
- ● Fungicide (preventative): Copper-based spray if your area is prone to holly leaf spot.
Step-by-Step guide to planting holly bushes
Here's how to establish these evergreen shrubs for decades of vibrant color and low-maintenance beauty.
🪴 Step 1: Choose the Perfect Planting Location
Holly bushes thrive in full sun to partial shade, with at least 4-6 hours of direct sunlight daily. I always pick a spot where they won't be shaded by trees or larger shrubs, as this leads to sparse growth and fewer berries. The soil should drain well—holly roots rot quickly in soggy conditions.
Test your spot by digging a 12-inch deep hole. If water pools after 10 minutes, amend the soil with 3-4 inches of compost mixed into the native soil. Hollys tolerate a wide pH range, but they perform best in slightly acidic soil (pH 5.0-6.5). A simple soil test kit confirms your conditions before planting.
🌱 Step 2: Dig and Prepare the Planting Hole
For each holly bush, dig a hole twice as wide as the root ball but no deeper. This encourages roots to spread outward rather than settle too low. I use a shovel to loosen the sides of the hole, creating a natural slope for roots to grow into.
Gently remove the holly from its container, tapping the sides to loosen compacted roots. If roots circle the root ball, use your fingers to tease them outward. Place the plant in the hole so the top of the root ball sits 1 inch above ground level. This prevents water from pooling at the stem and causing rot.
💧 Step 3: Backfill and Water Thoroughly
Fill the hole with native soil, pressing lightly to remove air pockets but not compacting too firmly. I like to add a handful of slow-release fertilizer mixed into the backfill to give the holly a nutrient boost without overfeeding. Water immediately after planting to settle the soil and eliminate gaps.
Give each bush 1 gallon of water at planting and again in 7-10 days to encourage root establishment. Avoid overhead watering—direct water at the base to keep foliage dry. Mulch with 2-3 inches of organic mulch (like pine straw or shredded bark) to retain moisture and suppress weeds.
☀️ Step 4: Space and Support for Long-Term Growth
Space holly bushes 6-10 feet apart, depending on the variety. Dwarf types like 'Dwarf Pfitzer' need only 3-4 feet of space, while standard varieties like 'American Holly' require full spacing. I always plant in odd-numbered groupings (3, 5, or 7 bushes) for a natural, balanced look.
Stake taller varieties if needed—holly bushes have shallow roots and may need support in windy areas. Use 2-3 stakes per plant, tying them loosely with soft plant ties. Avoid tight bindings that can girdle the stems as they grow. Prune only to shape after the first growing season, focusing on removing dead or crossing branches.
⏰ Step 5: Monitor and Maintain Through the First Year
Check soil moisture weekly during the first year—holly bushes need 1 inch of water per week, either from rain or irrigation. You'll know they're thriving when new growth appears in spring and berries form in fall. Fertilize lightly in early spring with a balanced, slow-release fertilizer (10-10-10 ratio).
Watch for signs of stress: yellowing leaves often mean overwatering, while brown edges signal underwatering. Holly bushes are generally pest-resistant, but keep an eye out for spider mites or scale in hot, dry weather. A strong spray of water usually resolves minor infestations before they become problematic.
Tips & tricks for perfect holly bush planting
Here's what I've learned from years of planting holly bushes that thrive for decades.
The Soil Test Secret: That 10-minute water test in Step 1 reveals everything about drainage. If water disappears within 5 minutes, you're golden—perfect conditions for holly roots. If it's still pooling after 15 minutes, you'll need to mix in more compost or create raised beds. I've seen holly bushes die from soggy soil within just two weeks of planting, so don't skip this test!
Root Ball Prep Technique: When teasing those circling roots in Step 2, work gently but firmly—you're not trying to break them, just encourage outward growth. I like to make small vertical cuts with my fingers along the root ball's perimeter to help roots spread faster. This simple step makes all the difference in establishing strong root systems.
Watering Wisdom: The 1 gallon at planting and again in 7-10 days is non-negotiable, but here's the trick: water deeply each time, soaking the entire root zone. Shallow watering encourages shallow roots that struggle in dry spells. I use a garden hose with a gentle spray nozzle to avoid displacing the soil around the roots.
Mulch Magic: That 2-3 inches of organic mulch in Step 3 isn't just for looks—it's a moisture regulator and weed barrier. I prefer pine straw because it mimics the natural forest floor holly bushes evolved in. Apply it in a 3-inch wide ring around each plant, keeping it 2 inches away from the stem to prevent rot.
Pro Tips for Planting Holly Bushes
- Here's what I've learned from years of planting holly bushes that thrive for decades.
- The Soil Test Secret: That 10-minute water test in Step 1 reveals everything about drainage.
- Root Ball Prep Technique: When teasing those circling roots in Step 2, work gently but firmly—you're not trying to break them, just encourage outward growth.
Frequently asked questions
Got questions about planting holly bushes? You’re not alone—these evergreens are popular, but their care can feel tricky at first. Below, we’ve rounded up the most common concerns to help you grow lush, healthy holly bushes with confidence.
When is the best time to plant holly bushes?
The ideal time to plant holly bushes is in early spring or early fall, when soil temperatures are mild and moisture levels are balanced. Planting in summer can stress young roots due to heat, while winter planting risks frost damage. If you must plant in summer, water deeply and mulch to retain moisture.
How long does it take for holly bushes to grow and produce berries?
Holly bushes grow at a moderate pace—expect 12–24 inches per year under ideal conditions. Female bushes (needed for berries) typically take 3–5 years to produce fruit, while male bushes (for pollination) may flower sooner. Patience pays off—healthy bushes reward you with vibrant berries in late fall or winter!
Are holly bushes prone to pests or diseases? How can I prevent them?
Holly bushes are generally hardy, but they can attract scale insects, spider mites, or holly leaf miner. To prevent issues:
- Keep bushes well-watered (drought stress attracts pests).
- Apply mulch to deter weeds and retain moisture.
- Inspect leaves regularly—early treatment with neem oil or insecticidal soap can save your plant.
Can I plant holly bushes in containers? What’s the best setup?
Yes! Holly bushes thrive in containers if given adequate space and drainage. Choose a pot at least 18–24 inches wide with drainage holes, and use a well-draining potting mix. Move containers to partial shade in summer to prevent root stress. Dwarf varieties (like ‘Sky Pencil’) are ideal for containers—just repot every 2–3 years.
Do holly bushes need winter care?
Most holly varieties are cold-hardy (USDA Zones 5–9), but young plants or tender varieties may need extra protection. Mulch heavily (3–4 inches) around the base to insulate roots, and water occasionally in dry winters. Avoid heavy snow buildup on branches—gently brush it off to prevent breakage.
What’s a good alternative if I don’t have space for a full-sized holly bush?
If space is limited, consider these low-maintenance alternatives:
- Dwarf English Holly (‘Convexa’): Compact, glossy leaves, and berries—perfect for small gardens.
- Inkberry Holly (‘Black Diamond’): Native, disease-resistant, and thrives in shade.
- Boxwood: Evergreen, low-growing, and great for hedges.
Wrapping up and next steps
Planting holly bushes is a rewarding way to add year-round beauty and low-maintenance charm to your landscape. With their glossy leaves, striking berries, and minimal pruning needs, these shrubs bring effortless elegance to any garden.
Whether you’re a seasoned gardener or just starting out, holly bushes are a fantastic choice for color, texture, and resilience.
Now that you’re armed with the right tips—from selecting the perfect spot to mastering care—take the next step and plant your holly bushes this season! Watch as they thrive, providing lush greenery and a touch of holiday magic all year long. 🌿✨