Tools
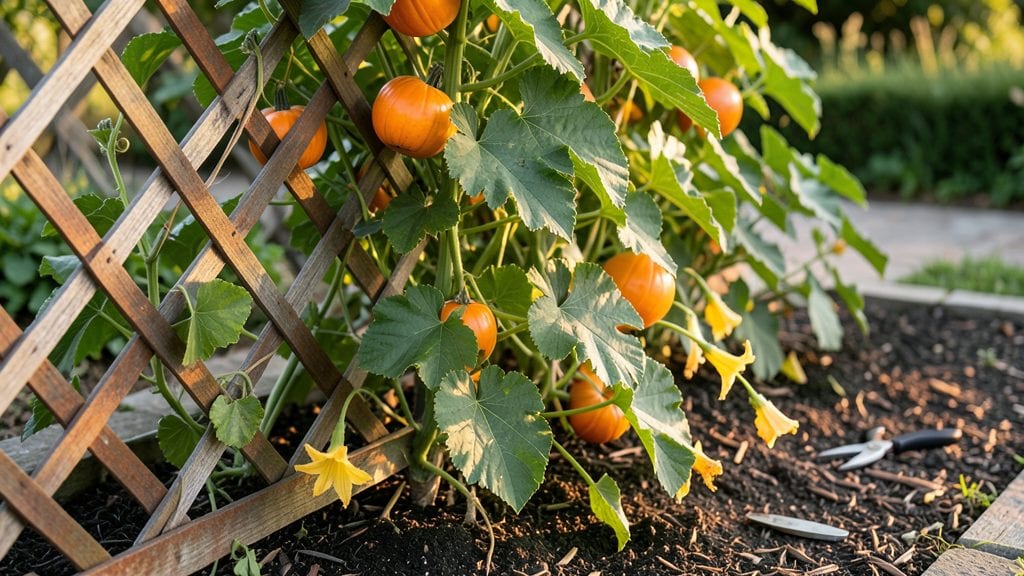
Growing pumpkins on a trellis turns sprawling vines into a space-saving vertical harvest that outproduces flat-ground plants. 🌱 I tried it after watching my small backyard garden get swallowed by 20-foot vines—now I grow 10 pumpkins in the same space using just a sturdy frame and some clever training.
The right trellis makes all the difference: heavy-duty T-posts or metal cages handle the weight, while burlap strips or old t-shirts let vines grip without damage.
You’ll need 10-12 feet of vertical space per plant, and the first vines climb within 2-3 weeks—just guide them gently to avoid breaking tender stems.
What you get is cleaner, healthier fruit with fewer rot spots from ground contact, plus easier harvesting and pest control. My trellis pumpkins ripen 2-3 weeks earlier than ground-grown ones and stay free of squash bugs—no more digging through vines to find the good ones.
Best for small spaces, container gardens, or urban plots where sprawl isn’t an option. Here’s how to set it up without wrestling with vines or sacrificing yield—just strong supports and patience.
📚 In This Guide
- What you need
- Instructions
- Tips and common mistakes
- Wrapping up and next steps
What you need
- ● Trellis Frame: 4–6 T-posts (5–6 ft tall, galvanized for durability) – quantity depends on trellis size
- ● 4–6 horizontal PVC pipes (4-inch diameter, 8–10 ft long) or wooden 2x4s (for DIY frames)
- ● Zip ties or plastic-coated wire (18–22 gauge) to secure vines
- ○ Support Accessories: Netting (optional but helpful for smaller varieties like baby pumpkins)
- ● Garden twine (for tying vines—avoid plastic ties that can girdle stems)
- ● Tools: Drill or hammer + nails (for assembling wooden frames)
- ● Measuring tape
- ● Scissors or wire cutters
- ● Gloves (to protect your hands from splinters or wire)
- ● Pumpkin variety: Choose vining types like ‘Sugar Pie,’ ‘Jack Be Little,’ or ‘Cinderella’ (bush varieties won’t need trellises!)
- ● Pruning shears (to trim excess vines and encourage upward growth)
- ● Mulch (straw or black plastic to retain moisture and suppress weeds)
- ● Post-hole digger (if installing T-posts permanently)
Step-by-step instructions for building a pumpkin trellis
Here's how I create sturdy, space-saving trellises that transform sprawling vines into vertical harvests.
🪴 Step 1: Choose and Prepare Your Trellis Structure
For four pumpkin plants, I use a 6-foot tall A-frame trellis made from 2×4 lumber and 1×2 lattice panels. The A-frame design provides maximum stability against vine weight. Cut two 6-foot vertical posts and two 3-foot horizontal supports to form the frame, securing them with galvanized screws. Attach the lattice panels vertically along the center of each post, spacing them 12 inches apart for vine attachment.
I always treat the wood with outdoor wood sealant before assembly to prevent rot. The lattice panels should face outward—this gives vines plenty of surface area to cling to without tangling. Position the trellis in full sun where it won’t be disturbed by foot traffic or wind. Real talk: if you skimp on the sealant, your trellis might collapse under a 20-pound pumpkin.
🌱 Step 2: Plant Pumpkin Seeds at the Base
Sow 4 pumpkin seeds (like 'Sugar Pie' or 'Jack Be Little') 1 inch deep in moistened potting mix, spacing them 3 feet apart at the base of the trellis. These varieties thrive vertically and produce manageable fruit sizes. Water immediately after planting to settle the soil around the seeds. I like to use biodegradable seed-starting pots for each seed—this makes transplanting easier later without disturbing roots.
Wait 5-7 days until cotyledons (first true leaves) appear before removing pots. Thin to your strongest seedling per pot, leaving the healthiest plant at each trellis position. Here's the thing—if you plant too many seeds, you'll waste time and resources on weak vines that can't support fruit.
☀️ Step 3: Train Vines as They Grow
Once seedlings develop 3-4 true leaves, gently guide the main vine toward the lattice using soft plant ties. I avoid metal or plastic ties—they can cut into tender vines. Instead, I use jute twine or old fabric strips to loosely secure the stem to the lattice every 12 inches. As the vine climbs, it will naturally twine around the lattice, but you'll need to redirect side shoots toward the structure to encourage upward growth.
Watch for male and female flowers—female flowers have a tiny pumpkin at their base. Once you spot a female bloom, hand-pollinate it by transferring pollen from male flowers with a paintbrush. This ensures fruit sets where you want it, often near the trellis for easier harvesting. Prune any vines growing away from the trellis to focus energy on upward growth.
💧 Step 4: Maintain Moisture and Support
Water at the base of the trellis every 2-3 days, ensuring the top 2 inches of soil feel moist but not soggy. Pumpkins need consistent moisture, especially as fruit develops. I use a drip irrigation system to avoid wetting leaves, which reduces disease risk. Mulch around the base with 2-3 inches of straw to retain moisture and suppress weeds—this keeps soil temps steady and roots happy.
As pumpkins grow, they’ll need extra support. I weave additional lattice panels or burlap strips between the main lattice for heavier fruit. Check vines weekly for signs of stress—yellowing leaves mean overwatering, while crispy edges signal underwatering. If a vine breaks under fruit weight, redistribute the pumpkin to another vine or prop it with a wooden cradle tied to the trellis.
✂️ Step 5: Harvest and Clean Up
Harvest pumpkins when their rinds turn hard and dull-colored, typically 80-100 days after planting. Gently twist the fruit from the vine—don’t cut the stem, as this can cause rot. I always leave 1 inch of stem attached to preserve the pumpkin’s shelf life. After harvest, remove all vines and compost them (unless diseased), then clean the trellis with a vinegar-water solution to remove sap and prevent pests.
Store pumpkins in a cool, dry place with good airflow—a garage or shed works well. Check weekly for soft spots, which indicate spoilage. Here’s a pro tip: if you’re saving seeds, scoop them from a healthy pumpkin, rinse, and dry them on a paper towel for 2-3 days before storing in an airtight container.
Tips & tricks for perfect pumpkin trellis planting
Transforming sprawling pumpkin vines into vertical powerhouses takes more than just a sturdy structure—it's about timing, technique, and a few strategic tweaks that make all the difference. Here's what I've learned after building trellises for years.
Material Selection: While 2×4 lumber and 1×2 lattice panels work perfectly, consider cedar wood for natural rot resistance if you're building a permanent structure. The lattice spacing of 12 inches is ideal—any wider and vines may struggle to find purchase, while narrower spacing can restrict growth. For budget options, chicken wire stretched between sturdy posts can work for smaller varieties like 'Jack Be Little', though it requires more frequent vine redirection.
Seedling Stage Strategy: The 5-7 day wait for cotyledons is crucial—don't rush this step. I've found that transplanting too early can shock delicate roots, while waiting too long risks overcrowding. Here's my game-changer: use clear plastic cups for seed-starting pots instead of biodegradable ones. This lets you monitor root development through the walls, so you can transplant when roots fill the bottom without circling. This prevents transplant shock and gives your seedlings a stronger start.
Vine Training Technique: When training vines in Step 3, think of the lattice as a highway system—you want one main vine "lane" with controlled access points. I tie vines at 12-inch intervals using jute twine, but here's the secret: make the knots loose enough to slide up as the vine grows. This prevents strangulation while maintaining direction. For side shoots, I use a simple "snip and redirect" method—cut any vine growing away from the trellis at a 45-degree angle to encourage outward growth toward the structure.
Harvest Timing: The 80-100 day window for harvest is flexible based on variety, but don't rely solely on days—watch for that dull-colored rind and firm texture. I've learned the hard way that waiting too long can lead to rot, especially with heavier varieties. Here's my trick: tap the pumpkin gently with your knuckle. A ripe one will sound hollow, while an underripe one will thud. This method works even when color changes are subtle due to weather variations.
Pro Tips for Pumpkin Plant Trellis
- Transforming sprawling pumpkin vines into vertical powerhouses takes more than just a sturdy structure—it's about tim...
- Material Selection: While 2×4 lumber and 1×2 lattice panels work perfectly, consider cedar wood for natural rot resis...
- Seedling Stage Strategy: The 5-7 day wait for cotyledons is crucial—don't rush this step. I've found that transplanti...
Frequently asked questions
Got questions about growing pumpkins vertically? Here are some of the most common concerns—and their solutions—to help you create the perfect pumpkin plant trellis for a thriving harvest!
What’s the best time to start training pumpkins up a trellis?
Start guiding pumpkins onto a trellis when vines are 4–6 inches long and have 3–5 leaves. Wait until after the first flowers appear to avoid damaging tender stems. For bush varieties, begin earlier (around 2–3 weeks after germination), while vining types like Howden or Cinderella can wait until they’re more established.
Can I use a trellis for small pumpkins or only big ones?
Trellises work for all pumpkin sizes! Small varieties like Jack Be Little or Sugar Pie thrive on lightweight trellises, while larger types (e.g., Atlantic Giant) need sturdy, wide-spaced frames. Just adjust spacing—smaller pumpkins can hang closer together, while big ones need 12–18 inches between vines to avoid overcrowding.
How do I keep pumpkins from rotting when grown vertically?
Use mesh bags or netting to support pumpkins as they grow. Ensure the trellis has good airflow and avoid overwatering the leaves. Prune excess foliage near the fruit to reduce humidity. For extra protection, apply a copper fungicide preventatively if your area is prone to blight.
What if my pumpkin vines won’t climb the trellis?
Pumpkins are not natural climbers, so you’ll need to gently tie vines to the trellis with soft twine or fabric strips every 2–3 days. Avoid metal ties that can cut into stems. If vines are weak, use a small stake nearby to support them while they strengthen. Patience is key—some varieties take longer to adapt!
Are there cheaper alternatives to store-bought trellises?
DIY options include:
- PVC pipes or rebar: Assemble into a teepee or A-frame for $10–$20.
- Wooden pallets or ladders: Repurpose into vertical frames with zip ties.
- Cattle panels: Cut and bend into arches for a durable, low-cost solution.
Wrapping up and next steps
Transforming your pumpkin patch into a space-saving, high-yielding garden is easier than you think! With a pumpkin plant trellis, you can grow bigger, healthier fruits while keeping your garden tidy and organized.
Whether you're a seasoned gardener or just starting out, this method opens up new possibilities for maximizing your harvest—so why not give it a try this season?
Ready to get started? Sketch your trellis design, gather your materials, and plant those seeds! Your future pumpkin harvests will thank you—happy gardening! 🌱🎃